
Using Useful Display Functions
You can display the multiple photos at once, specify the date (last modified date of data) to select photos, and switch the photo group.
Tap  on the photo selection screen to select the display menu.
- Viewing Multiple Photos to Select Photo
- Specifying Date to Select Photo
- Zooming in on Photo
- Switching Photo Group
Viewing Multiple Photos to Select Photo
The following screen is displayed by selecting  on the photo selection screen.

-
A: When the photo you want to print is selected, the touch screen returns to single photo display.
-
B: Select to display photo with specifying the date.
-
C: Select to increase the display photos. (54 photos display)
-
D: Drag to switch the number of display photos to 6 photos, 15 photos, or 54 photos.
-
E: Select to decrease the display photos. (6 photos display)
Specifying Date to Select Photo
The following screen is displayed by selecting  on the photo selection screen.
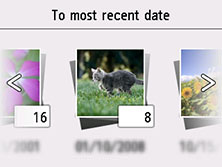
Flick horizontally to switch the date (update date of photo data).
The photos on date specified are displayed.
You can also select the date by tapping  or
or  .
.
![]() Note
Note
-
The date is displayed according to the settings of Date display format in Other printer settings under Printer settings.
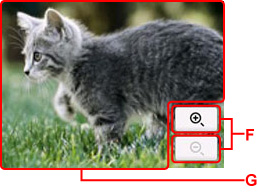
Zooming in on Photo
The following screen is displayed by selecting  on the photo selection screen.
-
F: Select to switch the display magnification.
-
G: Drag to move the display position.
Switching Photo Group
![]() Note
Note
-
If more than 2,000 photo data are saved on the USB flash drive, the photo data is split by group per 2,000 photos in reverse chronological order (date last modified) automatically.
The following screen is displayed by selecting  on the photo selection screen.

-
H: Select to switch the photo group.
